Introduction
There are a bunch of adorable kitties living in the bushes at NKU.
For much of the semester, a smattering of students and staff have been taking care of the cats. They serve daily meals, and have created small houses for the cats to live in.
However, feeding the kitties on a regular basis requires a signficant time commitment. Additionally, we knew that nobody would be on campus over winter break to feed the kitties.
So, my friends and I built an automatic cat feeder, robust enough to survive abuse by the wildlife and even the most severe snow storms.
Context
Here are the cats we are taking care of:


You might notice that some of the cats aren’t actually cats. We’ll get to that later.
Here is the area we were working with. The cats love to hang out in the bushes, and they wander around the courtyard area throughout the day.
Note that there’s only one outlet in the area, so we’re limited on where we can put the cat feeder.
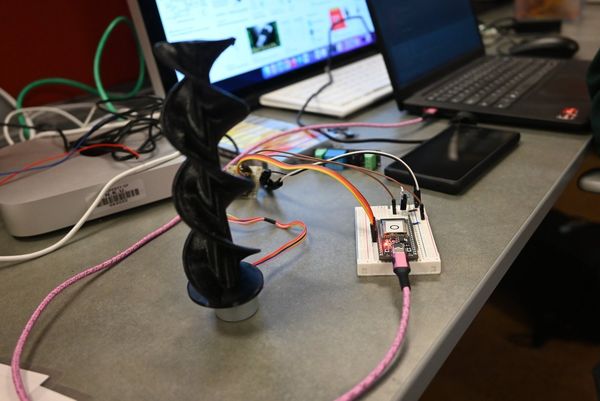
In the end, we made a cat feeder:
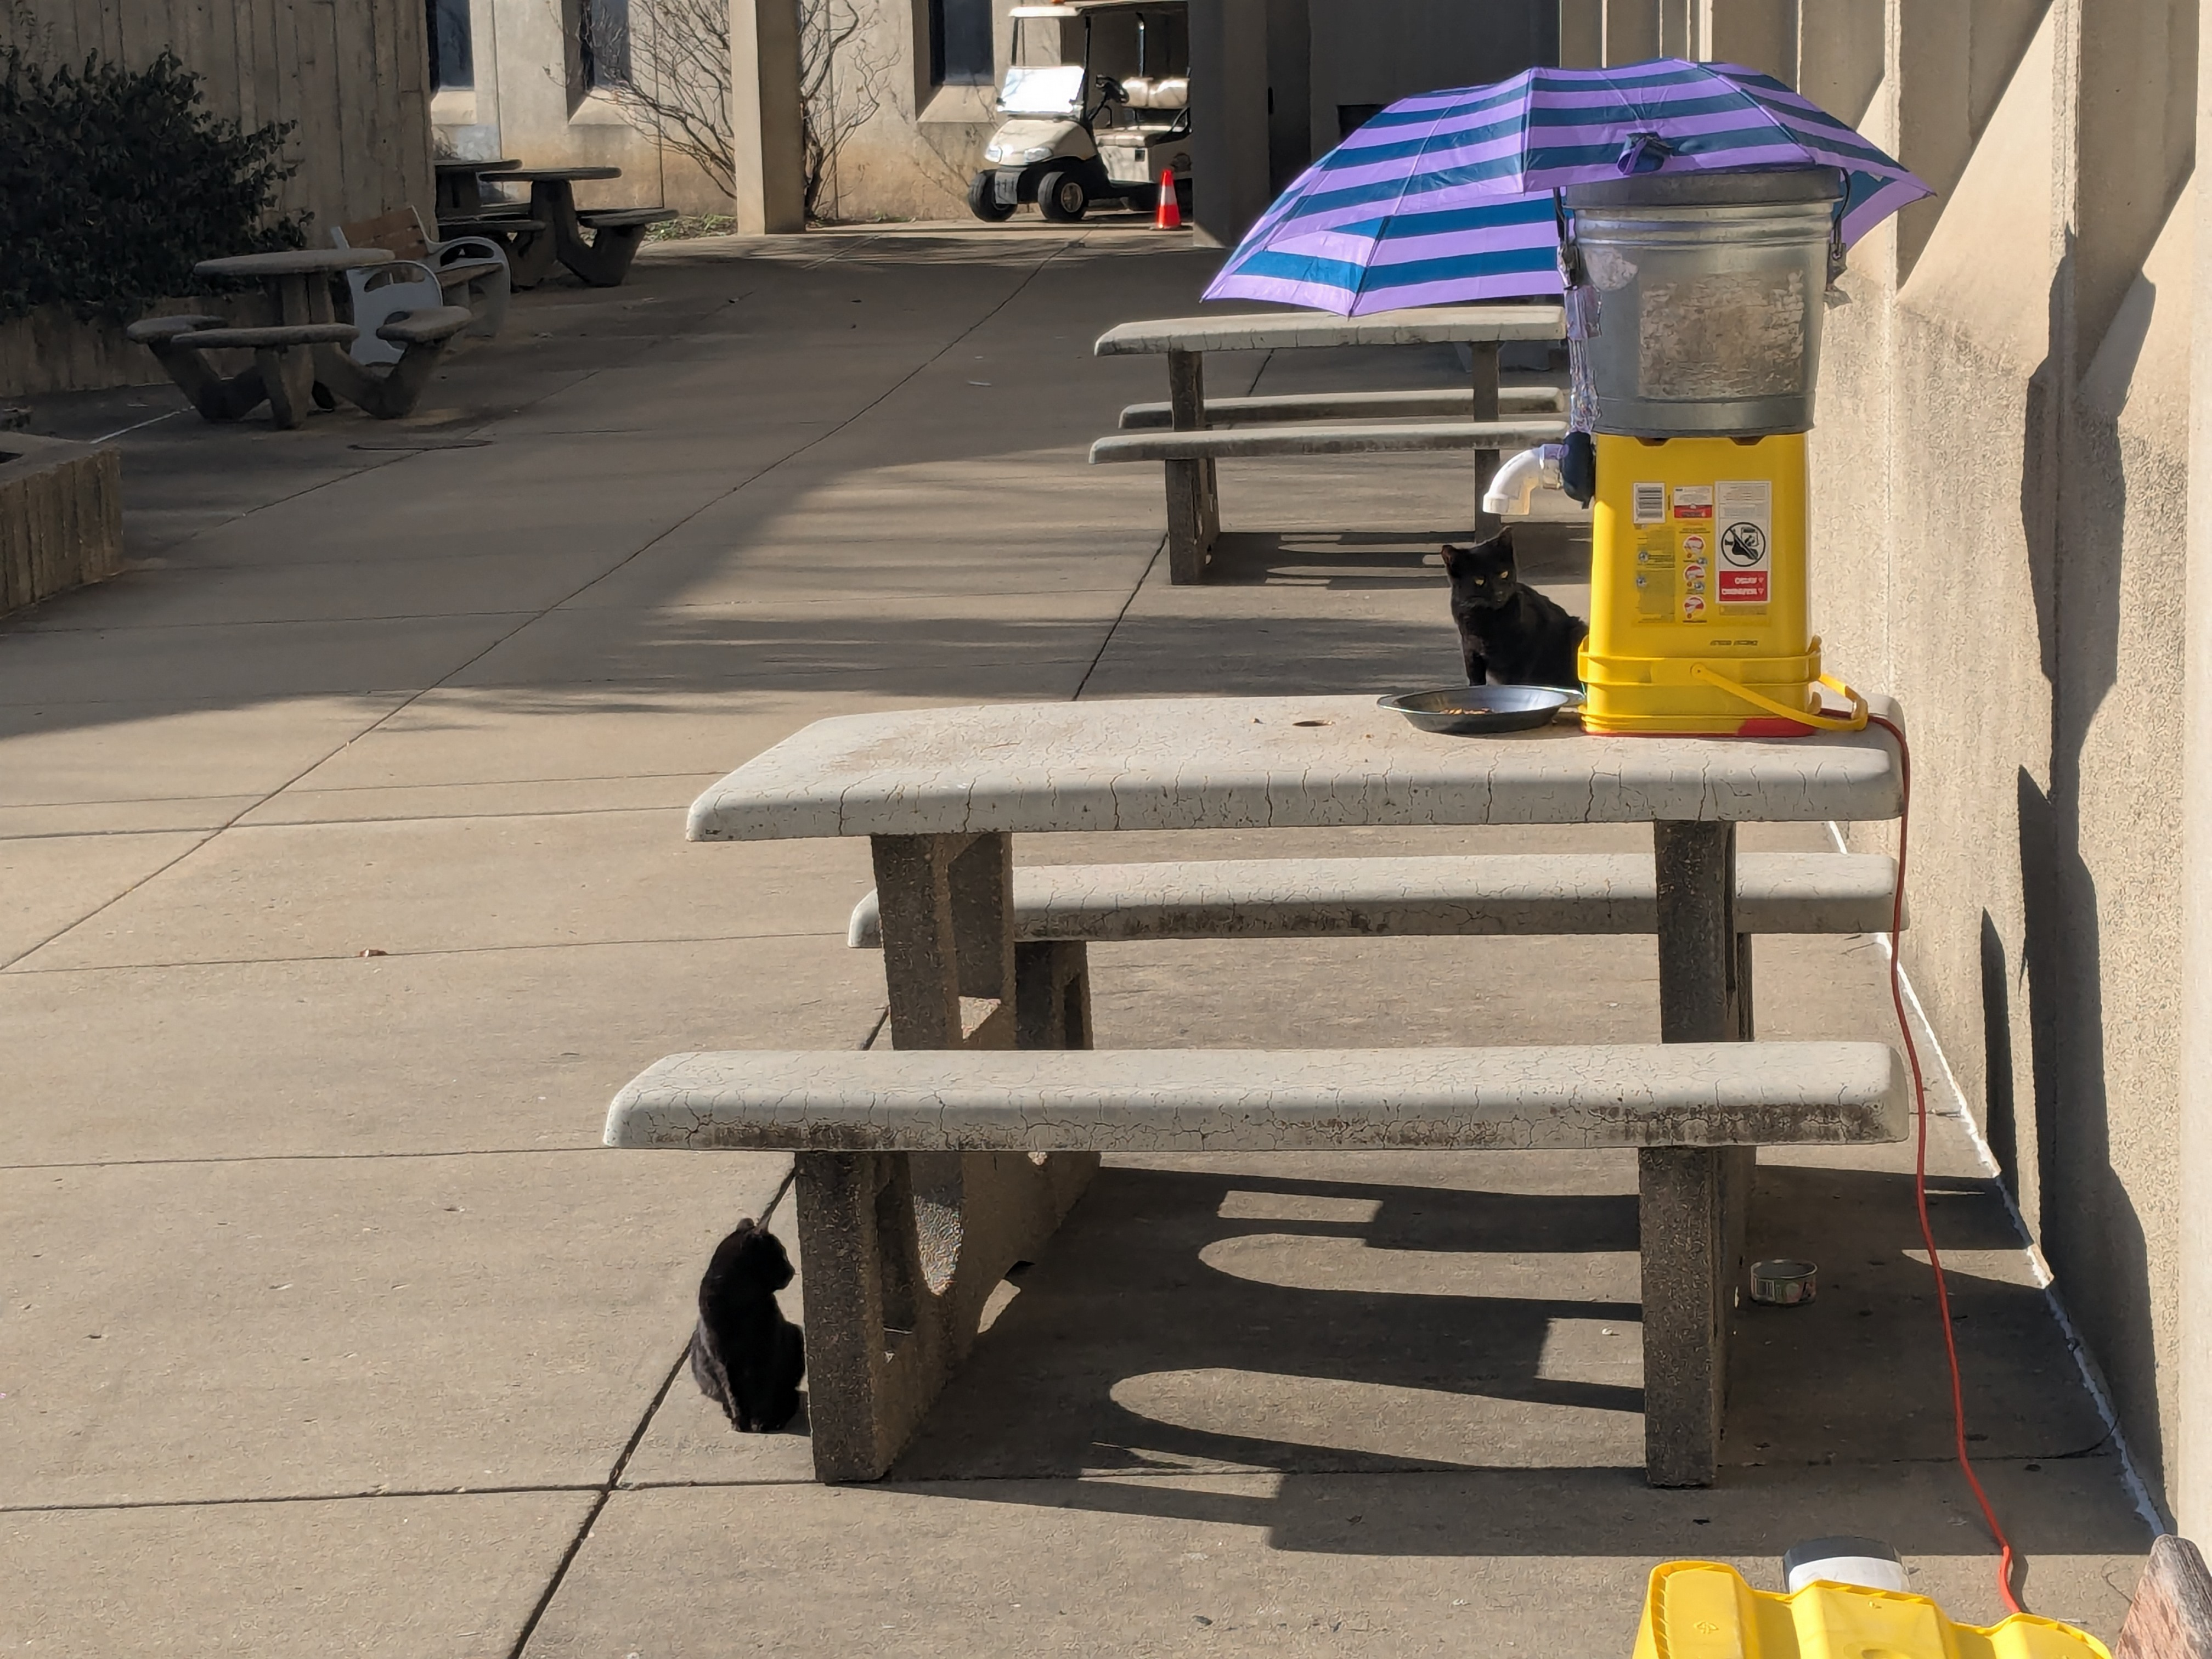
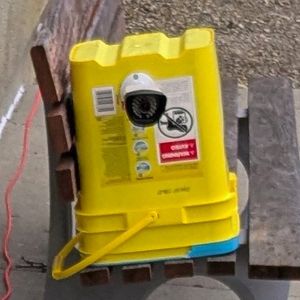
And we made a camera to record it:
Initial Development
Grace’s Design
Grace had been feeding the cats by hand for several weeks at this point.
When we talked about creating an automatic cat feeder, she created an amazing artistic representation of our goals:
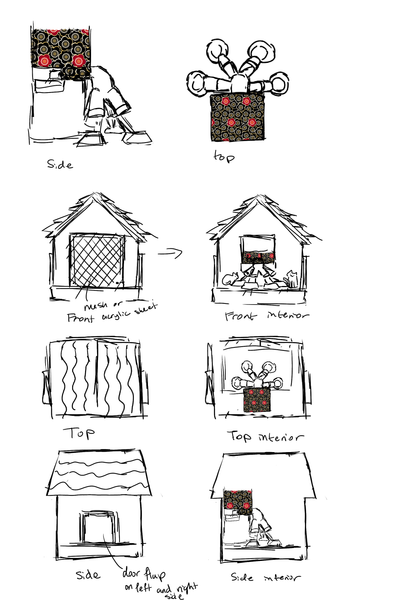
This illustrates the core functionality:
- Lots of food goes in the top
- A bit of food goes into food bowls at regular intervals
Originally, we wanted to have multiple food bowls, so that the cats don’t get in each others’ way, but we ended up only having one bowl for simplicity. We also never got around to building the housing for the cats, partially due to cost reasons.
Research
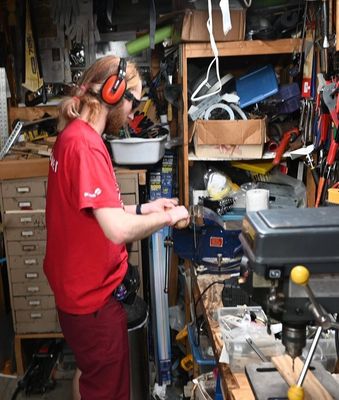
Initially, I wanted to do this project using only the tools available in the club room.
Given that we were going through renovations, my focus was largely limited to what I could build using solely 3d-printed components, and some motors intended for educational use.
We started out by doing some research on cat feeders.
For one, we took a look on Amazon, and found that it’s possible to buy an indoor automatic cat feeder, and it’s possible to buy outdoor feeding stations for cats, but we did not find many good options for true outdoor cat feeders.
We started looking into blog posts about this. We found this great Russian blog post and GitHub repo about building a cat feeder, which released the feeder screw for free.
In their project, they only 3d-printed the screw and used PVC pipe as the outer housing.
In our case, we have a lot of free filament, so we decided to 3d print the pipe as well to save costs.
First Auger
This led us to our first design:
In this case, we started with this prototype just to make sure food would come out:
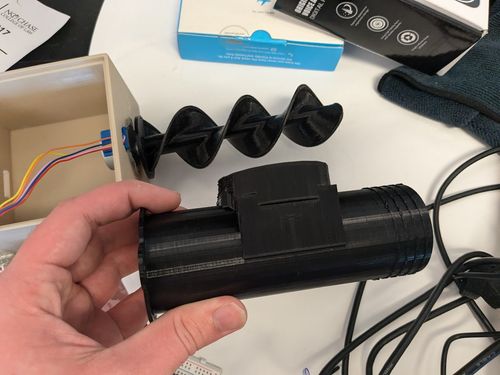
This was some of the first 3d-modelling I’ve ever done. I was using TinkerCad, as it was recommended for beginners. I found it to be quite approachable, although it certainly was not as powerful as something like OnShape (which also runs in the browser and is free for students!).
Through this initial prototype, I learned:
- The auger is effective at distributing dry cat food!
- It’s important to leave good tolerances. (The auger was too close to the pipe.)
We had a circuit that cut power to the 28BYJ48 motor and ULN2003AN driver board when it is not in use, to minimize overheating.
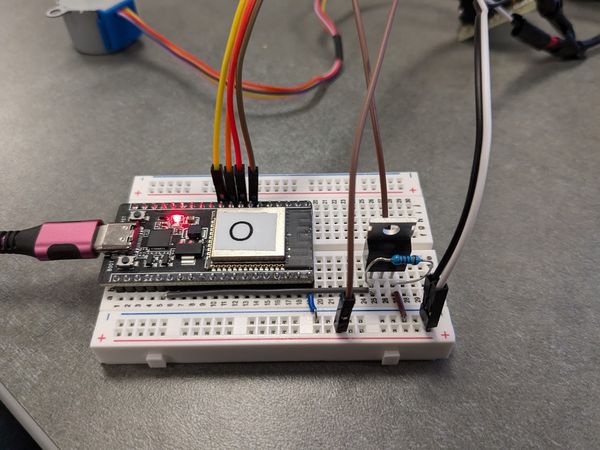
This uses a IRFZ44N N-Channel mosfet:
- Gate: Pin 2 on esp32
- Drain: Goes to the negative line on the ULN2003AN
- Source: Goes to the negative line for the 9V power supply
- Note: make sure to include a ~10KΩ resistor between the gate and the source.
Toby found this interesting article which detailed how to modify the stepper motor for more torque.
But, this all ended up being in vain, as the force from our little motor was nowhere near enough to overpower the cat food when little pellets get stuck between the auger and pipe.
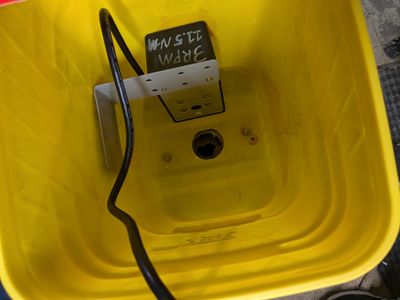
Rotisserie Chicken Motor
Enter: A rotisserie chicken motor!
It’s been sitting in my basement for years.
| Value | Property |
|---|---|
| 3 | Revolutions Per Minute |
| 11.5 | Newton-metres |
| 120 | Volts (AC) |
This motor is going to be strong enough!
The motor is too strong!
In some of the first tests, it immediately snapped the 3d printed design!
No worries!
Instead of using a tiny peg, we can modify the model to use a full rectangle’s worth of plastic. Plus, that means we can swap out the peg later, in case it snaps again! (foreshadowing)
And then, we made sure to print the square peg with 100% infill, so that it was as strong as possible.
Note that we were printing this out of PETG, solely because we have a lot of PETG.
Let’s build this thing!
With a working prototype, Grace, Patrick, and I began work on building the housing and containers for cat food.
Anything that can go wrong will go wrong.
— Murphy's law
We’re trying to keep our design as simple as possible, so that we minimize how many things can go wrong.
Dispensing cat food takes 4 steps:
- Cat food goes in the top bucket, which funnels into the auger.
- A control module turns on a motor.
- The motor turns the auger.
- Cat food flows out of the tube into the cat bowl.
Each step failed at some point during the month that it was running.
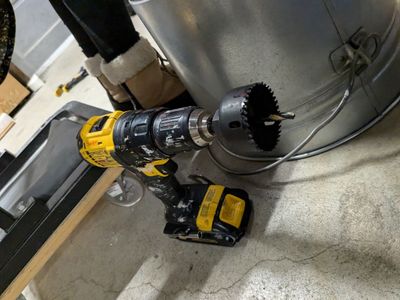
Step 1: Drill a hole in the top bucket
We built some supports to put under the bucket, so that we minimized the amount that the metal bends. We drilled through the bottom of the bucket, because the drills we had did not fit in the bucket.
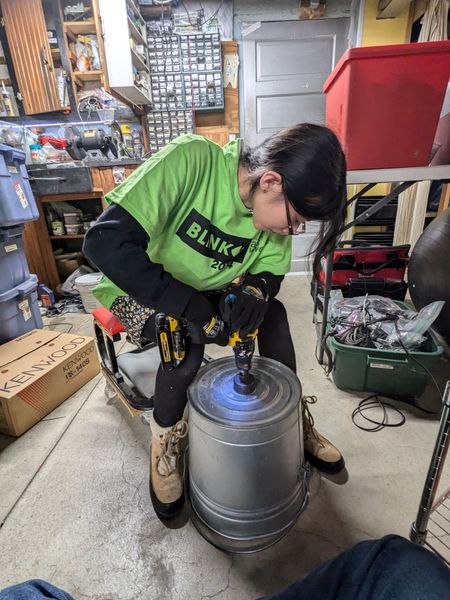
We used a wooden hole saw, because it was what we had. But, it worked well, as long as we went slow, and used some oil.
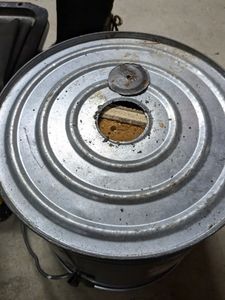
We used some construction plastic to create a funnel in the top bucket of the cat feeder, such that it would flow easily into the auger.
We followed the same procedure to drill a hole in the top of the bottom bucket.
Step 2: Join the top bucket to the bottom bucket
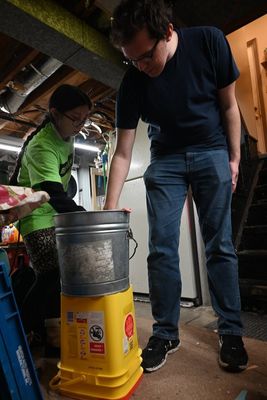
Next, we drilled some holes between the top and the bottom buckets, and I think we used #10 metric nuts & bolts to connect them.
(Apologies for the hazy measurements)
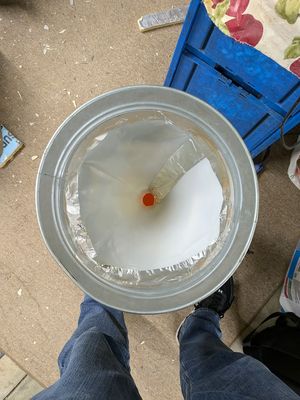
Step 3: Make a funnel
We want the cat food to flow smoothly from the top bucket into the auger.
So, we use some construction plastic and HVAC tape to make a funnel.
This still leaves enough space in the top bucket to fill it with about 16 lbs of cat food.
Step 4: Make a bracket to attach the motor
Next, we figure out where the motor needs to be mounted, and we build a bracket to match.
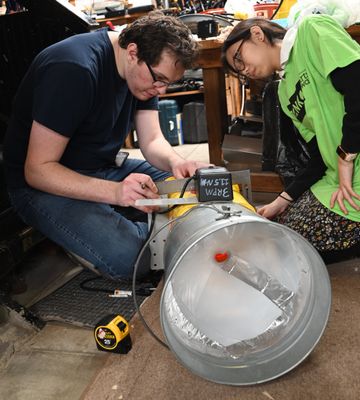
Originally, I was worried that this was not strong enough, because there was a little bit of flexibility under load.
However, I learned that:
If it doesn’t bend, it will break
In the end, it was good to have a bit of flex to the system, so that:
- it was easier to work with
- when the tube was blocked by solidified cat food, the bracket was able to provide enough flexibility that we avoided cascading failures (such as the auger tube or mountings)
TODO: Step 5: Print a new auger sheath
TODO: Cat Feeder Camera
TODO: Operations
TODO: Skunk damage & Repair
TODO: Winter storm
I think about these XKCD comics a lot:
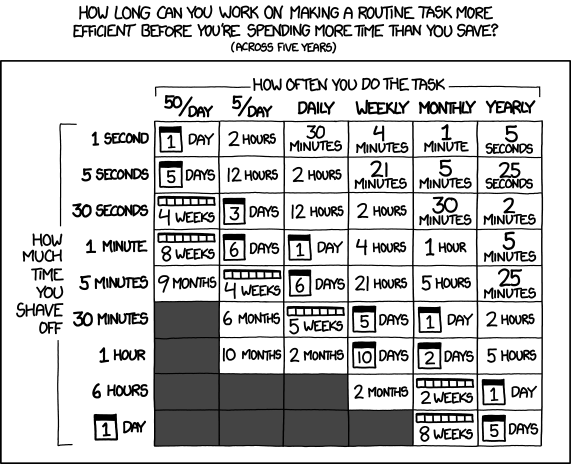

Is it worth it?
So, this prompts the question: Was it actually worth it?
Let’s analyze the project, and see if it saved me time.
The rules are:
- The cat feeder saves me time when it dispenses food.
- The cat feeder wastes time when I have to go fix it.
And, for every successful time that food is dispensed:
I took my Google Maps timeline, and did some analysis in Python.
Show Analysis
from datetime import datetime
from typing import NamedTuple, Self


class LatLong(NamedTuple):
    lat: float
    long: float
    timestamp: datetime

    @staticmethod
    def from_dict(data: dict) -> Self:
        assert "LatLng" in data
        lat, long = data["LatLng"].replace("°", "").split(", ")
        time = datetime.fromisoformat(data["timestamp"])
        return LatLong(float(lat), float(long), time)
import pandas as pd
import json

""" Note that the timeline export is only from the past month """
timeline_data_path = r"/home/sarge/Documents/Timeline.json"

with open(timeline_data_path) as f:
    data = json.load(f)
    df = pd.DataFrame(data['rawSignals'])
# forward-fill position for rows where probableActivities indicates 'STILL'
for idx in df.index:
    if pd.isna(df.at[idx, "position"]):
        activity = df.at[idx, "activityRecord"]
        if isinstance(activity, dict):
            probable_activities = activity.get("probableActivities", [])
            if any(
                act["type"] == "STILL" and act["confidence"] > 0.4
                for act in probable_activities
            ):
                # set the position value to the previous row's value
                previous_position = df.at[idx - 1, "position"]
                if isinstance(
                    previous_position, dict
                ):  # ensure there's a valid previous position
                    updated_position = previous_position.copy()
                    updated_position["timestamp"] = activity["timestamp"]
                    df.at[idx, "position"] = updated_position
df.drop(['activityRecord', 'wifiScan'], axis=1, inplace=True)
df.dropna(inplace=True)
df['latlong'] = df['position'].apply(LatLong.from_dict)
df['timestamp'] = df['position'].apply(lambda x: datetime.fromisoformat(x['timestamp']))
df['date']=df['timestamp'].apply(lambda x: x.date())
# https://stackoverflow.com/a/4913653
from math import radians, cos, sin, asin, sqrt


def haversine(lon1, lat1, lon2, lat2):
    """
    Calculate the great circle distance in kilometers between two points
    on the earth (specified in decimal degrees)
    """
    # convert decimal degrees to radians
    lon1, lat1, lon2, lat2 = map(radians, [lon1, lat1, lon2, lat2])

    # haversine formula
    dlon = lon2 - lon1
    dlat = lat2 - lat1
    a = sin(dlat / 2) ** 2 + cos(lat1) * cos(lat2) * sin(dlon / 2) ** 2
    c = 2 * asin(sqrt(a))
    r = 6371  # Radius of earth in kilometers. Use 3956 for miles. Determines return value units.
    return c * r
target_lat, target_long = 39.032433594938674, -84.46420203783482
threshold_km = 0.1
# GH is 200m away, and I'm often there for classes
df["distance_km"] = df["latlong"].apply(
    lambda x: haversine(x.lat, x.long, target_lat, target_long)
)
df["is_near"] = df["distance_km"] <= threshold_km
Process Time Wasted
I'm considering any time spent near the cat feeder during this time period to be time spent doing maintence.
Ideally, the machine should feed the cats and require no maintence.
We want to measure how far we have diverged from this ideal.
Note that I'm often in Griffin Hall, which is about 200m away from the cat feeder.
Therefore, we need to be rather selective with our definition of "near".
However, the data seems to be very precises, so this definition should be good enough.
"""Process time wasted"""

from datetime import timedelta

# chunk data into visits (https://stackoverflow.com/a/69104084)
df["visit"] = (df["is_near"] != df["is_near"].shift()).cumsum()
near_groups = df[df["is_near"]].groupby(["date", "visit"])

# calculate total time spent near the point per day
daily_time_near = {}
for (date, group_number), group in near_groups:
    start_time = group["timestamp"].min()
    end_time = group["timestamp"].max()
    if start_time != end_time:
        duration = end_time - start_time
    else:
        duration = timedelta(minutes=10)  # fallback, in case there's only one value
    if date in daily_time_near:
        daily_time_near[date] += duration
    else:
        daily_time_near[date] = duration

# print the results
for date, duration in daily_time_near.items():
    print(f"{date}: {duration.total_seconds() // 60}")
2024-12-05: 8.0
2024-12-07: 10.0
2024-12-10: 6.0
2024-12-12: 5.0
2024-12-13: 35.0
2024-12-16: 11.0
2024-12-17: 41.0
2024-12-18: 37.0
2024-12-19: 41.0
2024-12-20: 15.0
2024-12-21: 9.0
2024-12-23: 25.0
2024-12-25: 17.0
2024-12-28: 10.0
2025-01-02: 36.0
2025-01-05: 7.0
Process Time Saved
The time saved is a little different.
There are two events every day, one at 8am and one at 5pm (EST).
For each one of those events, I save the amount of time it would've taken me to drive to NKU and feed the kitties myself.
I've timed my walks to campus, so I'll say that:
- If I'm < 700m from NKU, I save 30 minutes
- If I'm > 700m from NKU, I save 2 * the time it would take me to drive there
event_hours = {8, 17}  # 8am, 5pm


def time_diff_from_event(timestamp: pd.Timestamp, hour: int) -> int:
    event_datetime = timestamp.replace(  # use given date
        hour=hour, minute=0, second=0, microsecond=0
    )
    return abs((timestamp - event_datetime).total_seconds())


closest_events = pd.DataFrame(columns=df.columns)
for date, data in df.groupby("date"):
    for hour in event_hours:
        closest_date, closest_data = min(
            data.iterrows(),
            key=lambda data: time_diff_from_event(data[1]["timestamp"], hour),
        )
        closest_events.loc[closest_date] = closest_data
closest_events.shape
(68, 7)
def cat_feeder_running(row: pd.Series) -> pd.Series:
    cat_feeder_started = '2024-12-18T00:00-05:00'
    downtime = [
        ('2024-12-19T00:00-05:00', '2024-12-20T00:00-05:00'),
        ('2025-01-09T00:00-05:00', '2025-01-10T00:00-05:00')
    ]
    return  (
        row['timestamp'] < datetime.fromisoformat(cat_feeder_started) or
        any(datetime.fromisoformat(start) < row['timestamp'] < datetime.fromisoformat(end) for start, end in downtime)
    )

closest_events = closest_events[~closest_events.apply(cat_feeder_running, axis=1)]
closest_events.shape
(38, 7)
"""Calculate driving times"""

from my_secrets import API_KEY

import googlemaps

gmaps = googlemaps.Client(key=API_KEY)

def get_driving_time(latlong: LatLong) -> int:
    """returns driving time to the target location in minutes"""
    origin = f"{latlong.lat},{latlong.long}"
    destination = f"{target_lat},{target_long}"

    now=datetime.now()
    directions_result = gmaps.directions(origin, destination, mode="driving", departure_time=now)
    assert directions_result is not None
    driving_time_seconds = directions_result[0]["legs"][0]["duration"]["value"]
    return driving_time_seconds // 60  # Convert to minutes
closest_events['driving_time'] = closest_events['latlong'].apply(get_driving_time)
import numpy as np

NEAR_RADIUS_KM = 0.7

closest_events["minutes_saved"] = np.where(
    closest_events["distance_km"] < NEAR_RADIUS_KM,
    30,  # I'm going to walk if I'm in my dorm
    closest_events["driving_time"] * 2, # otherwise, I drive there and back
)
for date, measurements in closest_events.groupby('date'):
    print(f"{date}: {measurements['minutes_saved'].sum()}")
2024-12-18: 60
2024-12-20: 76
2024-12-21: 82
2024-12-22: 60
2024-12-23: 66
2024-12-24: 82
2024-12-25: 158
2024-12-26: 60
2024-12-27: 60
2024-12-28: 426
2024-12-29: 792
2024-12-30: 60
2024-12-31: 60
2025-01-01: 80
2025-01-02: 60
2025-01-03: 60
2025-01-04: 52
2025-01-05: 52
2025-01-06: 60
Note that some data may have been modified after being exported.
For example, the cat feeder was not operational on December 19th, nor before December 18th.
As such, the "Time Saved" data for this time period has been removed for the final blog post.
Conclusion
From here, I have a set of data that gives me a rough estimate of how much time I've saved and spent.
For the final analysis, I have chosen to add some other blocks of time that were not included in this automatic analysis.
That is why the results from this notebook are a subset of the final conclusion in the blog post.
The following calendar illustrates how many minutes each day this project took, and how much it saved.
TODO: graph with time spent per day and time wasted per day, and then the sum of both as a sparkline
≈ 40 hours
≈ 40 hours
Credits
Thanks to everyone who helped make this a fun project!
| Name | Links | Credit |
|---|---|---|
| Grace Wu | Design, Artwork, Feeder Construction | |
| Patrick Hirsch | Photographer, Feeder Construction, Norse Code Radio representative | |
| Tyler Kobida | Raspberry Pi Configuration | |
| Toby Carter | Initial Prototyping |
Fun facts that I’ve been told:
- Tortishells and Calicos are female
- Orange Tabby is usually male